Una volta ho passato un intero pomeriggio convinto che il sito di un cliente fosse lento a causa di un bug di rendering nel mio codice di reazione. Profilato i componenti, memorizzato cose, inseguiva i re-render. Il problema reale era un'immagine di sfondo eroe: un JPEG da 3,1 MB salvato con una qualità del 100%, quando la stessa identica immagine con una qualità dell'80% sarebbe stata di 480 kb e sembrava identica. Avevo sovraccaricato l'app e ho ripensato le risorse. Questo è un modo molto sviluppatore per sprecare una giornata.
Da allora, la compressione delle immagini è stata la prima cosa che controllo, non l'ultima. It' è anche il più frainteso - & quot;comprimi senza perdere qualità" viene trattato come un paradosso, quando in realtà it' è solo questione di sapere quale leva scarta i dati e quale no' t. Questa guida è il modello mentale che utilizzo, costruito durante la spedizione di Toolz.dev e tuning Vitali Web principali sui siti client: come funziona effettivamente la compressione, quando utilizzare lossy contro lossless e perché un numero di qualità specifico continua a vincere.
tl; dr: maneggiare Comprimi immagine a circa l'80% di qualità per le foto web - che' è il punto debole in cui il file si restringe 60% può & #39; t dirlo a parte l'originale a dimensioni normali Comprimere dall'originale (non ricomprimere mai un JPEG) e sempre ridimensionare per visualizzare le dimensioni prima della compressione. per il massimo risparmio, convertire foto a webp primo. Tutto viene eseguito nel tuo browser: nulla viene caricato.
Cosa sta effettivamente succedendo quando comprimi un'immagine?
Un'immagine digitale è una griglia di pixel, ognuno dei quali memorizza il colore. Ecco perché le immagini RAW sono enormi. Un'immagine 1920×1080 a 24 bit colore è:
1920 × 1080 × 3 bytes = 6,220,800 bytes ≈ 5.93 MB
Quasi sei megabyte per una foto. Una pagina con dieci di essi sarebbe di 60 MB di download prima che venga caricata una riga di testo. La compressione esiste per renderlo sopravvissuto, e lo fa in uno dei due modi fondamentalmente diversi.
compressione senza perdita Trova i modelli nei dati e li codifica in modo più compatto, senza scartare nulla. L'immagine decompresso è pixel per pixel identica all'originale. Le tecniche sono eleganti: la codifica della lunghezza di marcia comprime "rosso, rosso, rosso, rosso, rosso" in "5× rosso" di dizionario (l'algoritmo di deflazione al core di PNG) sostituisce i modelli ricorrenti con codici brevi; il filtro di previsione memorizza ogni pixel come differenza da un valore previsto, quindi i gradienti uniformi diventano lunghi e piccoli numeri che si comprimono magnificamente. PNG, WebP senza perdita e Avif senza perdita di lavoro funzionano tutti in questo modo.
compressione persa ottiene risparmi molto maggiori buttando via i dati che il tuo sistema visivo difficilmente noterà - e it' è più intelligente di & quot; elimina alcuni pixel.& quot; Converte l'immagine da RGB a un modello di luminanza più colore (il tuo occhio è molto più sensibile alla luminosità che al colore), quindi riduce la risoluzione dei canali di colore mantenendo la luminosità nitida. Rompe l'immagine in blocchi, trasforma ciascuno in coefficienti di frequenza e arrotonda quelli ad alta frequenza - le texture sottili e il rumore - fino a un minor numero di valori. Quella fase di arrotondamento, la quantizzazione, è dove i dati vengono effettivamente persi. JPEG, WebP con perdita e AVIF con perdita seguono tutti questo arco.
Il risultato pratico: lossless è per immagini in cui ogni pixel è significativo: loghi, screenshot, diagrammi, qualsiasi cosa con testo nitido. Lossy è per fotografie e immagini naturali, dove & quot; sembra identico" conta molto di più di & quot; è bit per bit identico."
Cosa significano effettivamente le impostazioni di qualità?
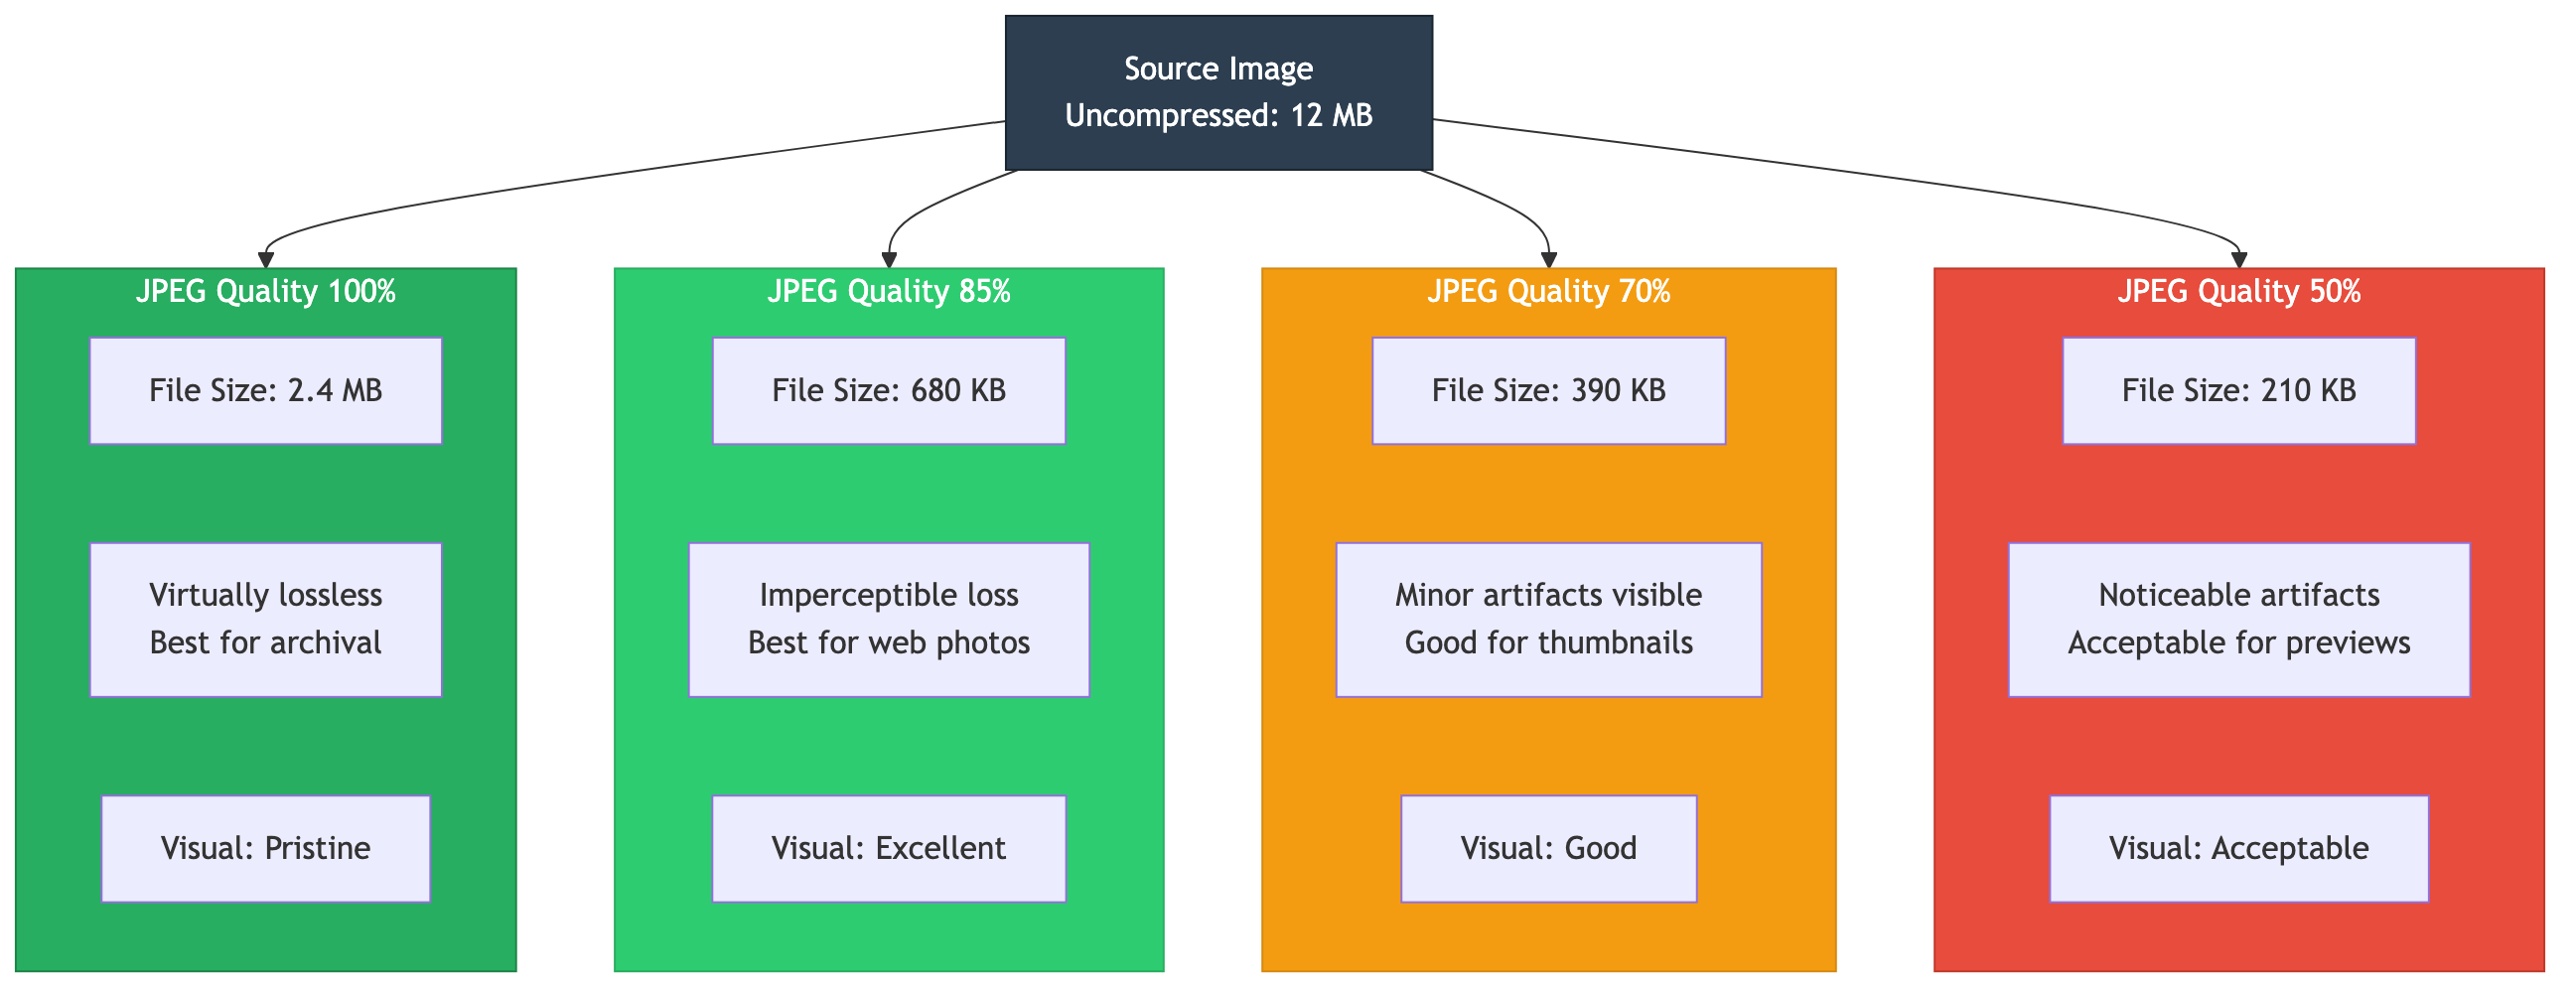
"Qualità 80%" è un numero di persone impostato senza sapere cosa li compra. Ecco la mappa che uso per JPEG e Lossy WebP, sulla base di molti confronti prima e dopo a dimensioni di visualizzazione reali.
100% (massimo): Quasi mai la scelta giusta. Il file è spesso 3–5 volte più grande dell'80% senza alcun miglioramento visibile. Quell'immagine dell'eroe che spreca il pomeriggio è stata salvata qui.
85–95% (alto): Per portfolio fotografici e immagini in cui i dettagli sottili contano davvero. Al 90%, gli artefatti sono invisibili alla maggior parte degli spettatori anche con uno zoom al 100%.
75–85% (il punto debole del web): 60–70% più piccolo del massimo, con artefatti invisibili alle dimensioni di visualizzazione normali. Questo è il punto in cui quasi tutte le immagini web appartengono.
50–75% (aggressivo): Per miniature e anteprime in cui le dimensioni sono critiche. Gli artefatti iniziano a mostrare in sfumature lisce e trame fini se guardi da vicino.
Sotto il 50%: Blocco visibile e fasciatura del colore. Riservalo per immagini a priorità bassa o vincoli di dimensioni rigide.
PNG lo fa' t ha un & quot;qualità" slider perché it's lossless - lo ottimizzi in modo diverso Il livello di compressione (09) scambia il tempo di codifica per un file più piccolo, con 6 un default sensibile La profondità di colore di riduzione aiuta enormemente quando un'immagine utilizza pochi colori un logo a 16 colori sceso da 24 bit a 8 bit si riduce drasticamente con zero cambiamenti visibili E i metadati di stripping - EXIF, profili di colore, timestamp - trims byte che non hanno mai influenzato l'immagine.
WebP è il mio web predefinito: con qualità 80 funziona 25% in meno rispetto a JPEG con qualità equivalente, e fa anche una modalità senza perdita di dati che batte PNG di circa un quarto AVIF comprime ancora più forte - comunemente più piccolo del 50% + rispetto a JPEG - ma codifica più lentamente e isn' t abbastanza universalmente supportato, quindi lo servo con un fallback WebP piuttosto che da solo.
In quale formato dovresti comprimere?
Scegliere il formato è metà della battaglia di compressione e la decisione è più semplice di quanto le opzioni lo facciano sembrare. Ecco il confronto che consegno a un nuovo compagno di squadra:
| formato | tipo | vs Dimensione JPEG | trasparenza | Meglio per |
|---|---|---|---|---|
| JPEG | impertinente | linea di base | no | Foto in e-mail, ripiego universale |
| png | senza perdita | molto più grande per le foto | certo | Screenshot, loghi, testo, diagrammi |
| webp | ambo | 25–35% più piccolo | certo | Predefinito per foto e grafica web |
| avifa | ambo | ~50% più piccolo | certo | Risparmio massimo, con un fallback webP |
Il singolo errore di formato più comune - e I & #39; l'ho catturato nella revisione del codice più volte di quanto possa contare - è salvare le fotografie come PNG Poiché PNG è senza perdita di dati, una foto salvata come PNG può essere molte volte più grande della stessa foto di un JPEG di qualità 85% senza differenze visibili PNG è per la grafica con bordi rigidi e testo, non per le immagini naturali Usa JPEG o WebP per le foto e recupererai la maggior parte di una pagina gonfiata's peso in una modifica.
La conversione è un lavoro in due clic sul convertitore di formato. Il modello che spedisco effettivamente consente al browser di negoziare:
<img src="photo-800.webp"
     srcset="photo-400.webp 400w, photo-800.webp 800w, photo-1600.webp 1600w"
     sizes="(max-width: 600px) 400px, 800px"
     alt="Description">
la quale srcset Posa il browser in diverse dimensioni e consente di scaricare quello che si adatta al dispositivo, in modo che un telefono non estrai mai l'immagine sul desktop. In combinazione con il giusto formato, è la differenza tra un sito veloce e uno lento.
Qual è l'ordine corretto per comprimere le immagini web?
L'ordine conta più di qualsiasi impostazione individuale, e sbagliare è l'errore tranquillo dietro la maggior parte di "L'ho compresso ed è ancora enorme" lamentele. La sequenza, ogni volta:
Ridimensiona prima. Comprimendo un'immagine 4000×3000 che verrà visualizzata a 800×600 sprechi di spreco su pixel che stanno per essere scartati e il risultato è ancora molto più grande del necessario. ridimensionare alle dimensioni del display (doppio per retina) prima toccando il compressore. Questo riordino risolve più problemi di immagini sovradimensionate rispetto a qualsiasi modifica di qualità.
convertire secondo. Sposta le foto su WebP (o AVIF con un fallback) utilizzando il convertitore di formato. Ora stai comprimendo l'immagine più piccola e formattata.
Comprimi terzo. far scorrere Comprimi immagine a circa l'80% per le immagini web con perdita, quindi giudica il risultato A dimensione effettiva di visualizzazione- non è stato ingrandito al 400%, perché nessuno vede una pagina web in questo modo.
Per rendere questo cemento qui' esegue il pass di ottimizzazione web eseguo su una pagina reale: audit con Lighthouse per trovare le immagini pesanti, ridimensionarle ciascuna alle dimensioni del display, convertirle in WebP, comprimere al 7580%, quindi ripetere Lighthouse per confermare Il risultato tipico è il 50% di sconto sull'immagine totale e un salto misurabile in Largest Contentful Paint, che è la metrica che mi ha inviato lungo l'intero percorso in primo luogo.
Per un tour più ampio di ridimensionamento, scelta del formato e rimozione del background insieme alla compressione, il Guida agli strumenti di immagine Copre il kit completo degli strumenti.
Quali errori di compressione costano di più?
Una manciata di errori spiega la maggior parte dei byte sprecati e il danno di qualità più visibile. Ho realizzato ognuno di questi.
con riferimento a -Comprimendo un JPEG già compresso. Ogni round di compressione con perdita impila nuovi artefatti sopra quelli vecchi e il danno è cumulativo e permanente. Comprimi sempre dalla fonte originale, e conserva quegli originali: genera ogni versione compressa da essi, mai da una precedente copia compressa.
Usando PNG per le fotografie. Coperto sopra, ma è la più grande vittoria singola quando la vedi: una foto PNG da 5 MB diventa un JPEG di 500 KB senza alcuna differenza visibile.
sovraccarica. Riportare JPEG al 30% rende piccoli file con blocchi e bande visibili. Rimani al 75–85% per il web e prova a dimensioni reali per trovare il tuo pavimento.
saltando il passaggio di ridimensionamento. La compressione prima del ridimensionamento, come sopra, produce file di qualità sia più grande che di qualità inferiore a quella che dovrebbero essere.
ignorando i formati moderni. La pubblicazione di JPEG quando WebP è disponibile lascia il 25-35% del potenziale risparmio sulla tabella senza motivo.
Se vuoi controllare il tuo lavoro in modo obiettivo, esistono metriche percettive: SSIM superiore a 0,95 è generalmente & quot; visivamente senza perdita di dati, & quot; e Google' i punteggi Butteraugli inferiori a 1,0 significano che le differenze sono essenzialmente invisibili, ma onestamente, per il lavoro quotidiano, visualizzare la versione originale e quella compressa fianco a fianco a dimensioni reali ti dice quasi tutto ciò che i calcoli farebbero.
Domande frequenti
Come comprimi le immagini senza perdere la qualità?
Per una compressione lossless vera e perfetta, usa PNG o WebP senza perdita Per & quot; visivamente lossless" - nessuna differenza puoi vedere - usa JPEG WebP a 8090% di qualità Il Comprimi immagine Lo strumento consente di impostare la qualità e confrontare l'originale con la versione compressa prima del download, in modo da poter trovare il punto esatto in cui la dimensione diminuisce ma l'immagine sembra ancora intatta.
Perché l'80% di qualità è considerato il numero magico?
In molti test prima e dopo con dimensioni di visualizzazione reali, la qualità JPEG o WebP intorno all'80% è dove il file si è ridotto del 60-70% dal massimo, ma gli artefatti sono ancora invisibili senza pixe-peep. Vai più in alto e paghi molti byte per i dettagli che nessuno vede; vai molto più in basso e i gradienti iniziano a fasciarsi. È il miglior equilibrio per l'uso web, motivo per cui è l'impostazione predefinita che raggiungo.
Qual è il miglior formato di immagine per i siti Web nel 2026?
WebP è il miglior default - circa il 25% più piccolo di JPEG con supporto browser effettivamente universale Per il massimo risparmio, utilizzare AVIF (circa il 50% più piccolo di JPEG) servito con un fallback WebP in un <picture> elemento. convertire con il convertitore di formato. Mantieni l'arte vettoriale genuina come i loghi come SVG piuttosto che comprimerli come raster.
Qual è la differenza tra compressione lossy e lossless?
La compressione senza perdita di dati riordina i dati in modo più efficiente senza scartarne nessuno, quindi il risultato è pixel per pixel identico all'originale - PNG funziona in questo modo La compressione con perdita rimuove permanentemente i dati che è improbabile che il tuo occhio noti, ottenendo risparmi molto più elevati - JPEG funziona in questo modo Lless produce in genere una riduzione dell'1040%; la perdita produce comunemente il 6090% Utilizza la perdita per la perdita di testo e grafica per le fotografie.
Devo ridimensionare un'immagine prima o dopo la compressione?
Ridimensiona sempre prima Comprimendo un'immagine grande e poi restringendola si spreca lo sforzo di compressione sui pixel che il ridimensionamento scarta, lasciando un file che' è sia più grande che di qualità inferiore di quanto dovrebbe Ridimensionare prima alle dimensioni del display, quindi comprimere l'immagine più piccola - quell'ordine produce il risultato più piccolo e pulito.
È sicuro comprimere le immagini con uno strumento online?
La maggior parte dei compressori online carica le tue immagini sui propri server per elaborarle, il che è un problema per le foto personali o il lavoro con i clienti. la Comprimi immagine tool su Toolz.dev viene eseguito interamente nel browser utilizzando l'API canvas, in modo che le immagini non lascino mai il dispositivo, sicuro per qualsiasi cosa privata o proprietaria.
Perché comprimere la stessa immagine due volte è una cattiva idea?
La compressione con perdita scarta i dettagli, e facendolo due volte lo scarta due volte - il secondo passaggio aggiunge nuovi artefatti sopra il primo pass's, e nessuno di esso ritorna Questo è il motivo per cui si dovrebbe sempre mantenere l'originale e generare ogni versione compressa da esso, piuttosto che comprimere un file che era già compresso una volta.
Come faccio a sapere se le mie immagini sono troppo grandi?
Esegui Google Lighthouse o PageSpeed Insights sulla tua pagina; entrambi segnalano immagini sovradimensionate e suggeriscono dimensioni migliori. Una rapida regola pratica: se una singola immagine supera i 200 KB, vale la pena ottimizzare e in particolare le immagini degli eroi dovrebbero essere ben al di sotto di quella poiché guidano la vernice più grande e contenta. Alimenta i trasgressori attraverso il flusso di lavoro e il riaudit di ridimensionamento del reametizzatore di ridimensionamento.
Come faccio a comprimere un'immagine in una dimensione del file specifica come 200 kb o 1 MB?
Ridimensiona prima le dimensioni del display, quindi abbassa la qualità fino a cancellare il target: inizia dall'80% e, se sei ancora finito, prova il 70%, quindi il 60%. la Comprimi immagine Lo strumento mostra la dimensione dell'output mentre muovi il cursore, in modo da poterlo guardare oltre la soglia anziché indovinare e riesportare. Il passaggio al formato WebP di solito ti acquista un altro 25-35% con la stessa impostazione di qualità, che spesso è sufficiente da solo.
La compressione di un'immagine riduce la sua risoluzione o le dimensioni?
No - compressione e ridimensionamento sono operazioni separate Comprimere una foto 3000×2000 le lascia 3000×2000; memorizza solo quei pixel usando meno byte, al costo di qualche dettaglio fine Se vuoi meno pixel, quello' è un ridimensionamento, e quello' è il cambiamento che di solito fa risparmiare più peso Fare entrambe le cose, in quest'ordine, è ciò che trasforma un file di fotocamera da 6 MB in un'immagine web da 90 KB.