La prima volta che una homepage di client's non è riuscita a Vitali Web principali audit a causa mia, il colpevole era una singola immagine di eroe: un PNG da 4,2 MB che un designer aveva esportato direttamente da Figma e lasciato cadere nella libreria multimediale di WordPress. Si mostrava a 1200 px di larghezza e memorizzato a 3800 px. La pagina impiegava undici secondi per dipingere su una connessione mobile strozzata. I'd lo ha spedito.
Questo è stato durante i miei giorni di amministrazione del WP e mi ha insegnato qualcosa che ha plasmato ogni strumento di immagine per cui in seguito ho costruito Toolz.dev: La maggior parte dei problemi di immagine non sono problemi di modifica, sono tubatura problemi. Dimensioni errate, formato errato, nessun passaggio di compressione. Non hai bisogno di Photoshop per risolvere il problema. Hai bisogno di tre o quattro piccoli strumenti che facciano bene una cosa e funzionino velocemente.
Questa guida attraversa ogni operazione di immagine quotidiana - ridimensionamento, compressione, conversione di formato e rimozione dello sfondo - con il ragionamento dietro ognuno e gli errori che I & #39; ha fatto in modo da poterli saltare Ogni strumento su Toolz.dev elabora le immagini interamente nel tuo browser Le tue foto non toccano mai un server, il che conta più di quanto le persone realizzino una volta che loro & #39; stanno gestendo il lavoro del cliente o le foto personali.
tl; dr: Per i lavori comuni puoi rimanere nel browser al 100%: Ridimensionamento immagine Per fissare le dimensioni, Comprimi immagine per tagliare la dimensione del file, convertitore di formato per spostarsi tra PNG/JPEG/webp/AVIF e solvente per sfondo per scatti puliti di prodotti e profili Niente carica - il file si sposta dal tuo disco nella scheda del browser e rimane lì L'ordine di ottimizzazione corretto è quasi sempre ridimensiona, quindi converti, quindi comprimi.
Perché elaborare le immagini nel browser invece di caricarle?
La maggior parte degli "Strumenti di immagine online gratuiti" funzionano allo stesso modo sotto: carichi il file, un server lo elabora, scarichi il risultato. La pagina web è una pelle sottile su una macchina noleggiata da qualche parte. Quel modello ha tre problemi e la privacy è solo il più rumoroso.
La privacy è la preoccupazione ovvia Scatti di prodotti sotto embargo, foto di identità, screenshot di dashboard interni, immagini personali: le immagini di cui le persone hanno più spesso bisogno per ridimensionare o comprimere sono esattamente quelle che dovrebbero & #39; t sedersi in una directory temp di stranger' & quot; File eliminati dopo un'ora& quot; è una promessa che puoi & #39; t audit.
La latenza è il costo più silenzioso Caricare un lotto di immagini della fotocamera da 20 MB sul Wi-Fi dell'ufficio richiede più tempo del ridimensionamento stesso Uno strumento basato su browser salta il viaggio di andata e ritorno - il & quot; upload" è istantaneo perché il file si sposta appena in memoria Quando I & #39; m elabora una cartella di foto di prodotti, quella differenza è la differenza tra una pausa caffè e un flusso continuo.
E poi ci sono i muri che nessuno menziona fino a quando non ne ha raggiunto uno: limiti delle dimensioni di file, limiti giornalieri, "upgrade a Pro per elaborare immagini oltre i 10 MB" filigrane sul livello libero. Uno strumento lato client ha esattamente un limite ed è la RAM della tua macchina.
La tecnologia per fare tutto questo in una scheda è stata standard per anni. l'HTML <canvas> Element e il suo contesto 2D possono decodificare, ricampionare e ricodificare le immagini raster senza alcun server. proprio il browser Image Il decoder gestisce JPEG, PNG, WebP e sempre più AVIF. Non c'è più un motivo tecnico per inviare una foto su Internet solo per renderla largo 800 px.
Come si ridimensiona un'immagine alle giuste dimensioni?
Il ridimensionamento è l'operazione che raggiungo di più e ottenere le dimensioni corrette a monte previene la maggior parte dei problemi di prestazioni a valle. La regola che vorrei interiorizzare prima: non memorizzare mai un'immagine molto più grande delle dimensioni più grandi che possa mai visualizzare.
il flusso di lavoro sul Ridimensionamento immagine Strumento:
- Trascina l'immagine sullo strumento o fai clic per navigare.
- Immettere la larghezza e l'altezza del target in pixel.
- Mantieni il blocco del rapporto aspetto a meno che tu non voglia deliberatamente allungarti, con esso acceso, cambiando larghezza si regola automaticamente l'altezza in modo che nulla si distorca.
- Scegli il metodo di ricampionamento (il bicubico è l'impostazione predefinita sicura per le foto; il vicino più vicino per la pixel art che vuoi mantenere nitido).
- Elabora e scarica.
L'unico numero che vale la pena memorizzare è il moltiplicatore Retina Uno slot che visualizza a 800 px dovrebbe contenere un'immagine a circa 1600 px in modo che rimanga nitida su schermi 2× - non il mostro da 3800 px che ho spedito quella prima volta Doppio della dimensione del display, non cinque volte.
Ecco un cheat sheet per caso d'uso che tengo bloccato, perché "quale larghezza dovrebbe essere" è la domanda che emerge in ogni progetto:
| caso d'uso | Larghezza obiettivo | rapporto di aspetto | formato |
|---|---|---|---|
| Eroe del sito web | 1920 px | 16:9 | webp |
| Blog / Immagine di contenuti | 1200 px | 3:2 o 16:9 | webp |
| unghia del pollice | 320–400 px | 1:1 o 4:3 | webp |
| Post di Instagram | 1080 px | 1:1 | JPEG |
| X / Twitter in fase di alimentazione | 1200 px | 16:9 | JPEG |
| Intestazione e-mail | 600 px | 3:1 | JPEG |
| prodotto e-commerce | 1000–1500 px | 1:1 | WebP o PNG |
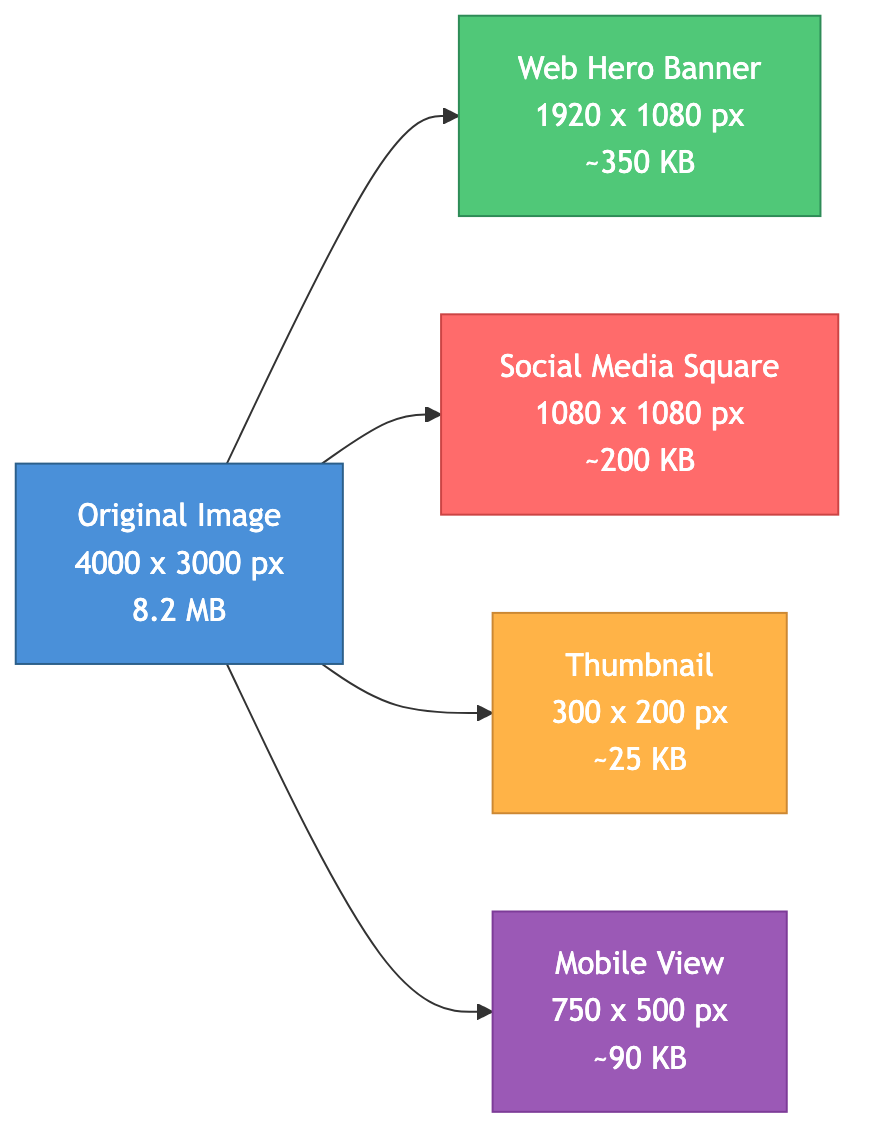
Un errore che vedo ancora nella revisione del codice costantemente: l'upscaling. Fare un'immagine maggiore oltre alla sua fonte, può #39; t inventare dettagli che non sono mai stati catturati: lo strumento interpola semplicemente nuovi pixel e oltre il 200% circa ottieni un risultato morbido e pastoso. Se un client invia un logo da 500 px e ne ha bisogno a 2000 px, la risposta onesta è & quot; riesportalo dalla sorgente vettoriale, & quot; non & quot; ridimensionalo e spera.& quot;
Come si comprime un'immagine senza distruggerla?
La compressione è il luogo in cui vivono i veri risparmi di peso della pagina. Le immagini sono in genere la cosa più pesante su una pagina Web, quindi ridurle è il lavoro di prestazioni più elevato che la maggior parte dei siti può fare.
Ci sono due tipi e la distinzione decide tutto:
compressione persa butta via i dati che è improbabile che l'occhio umano non possa cogliere: variazione di colore sottile, texture ad alta frequenza Un JPEG con qualità 80 è spesso più piccolo del 60% rispetto alla stessa immagine umana con la massima qualità senza differenze visibili con dimensioni di visualizzazione normali Questo è ciò che desideri per le fotografie.
compressione senza perdita riorganizza i dati in modo più efficiente senza scartarne nessuno; l'immagine decompressa è identica pixel per pixel Il PNG funziona in questo modo Utilizzalo quando ogni pixel è importante - loghi, screenshot, diagrammi, qualsiasi cosa con testo nitido o bordi rigidi.
la Comprimi immagine tool ti consente di impostare un livello di qualità, visualizzare in anteprima il risultato e confrontare le dimensioni dei file fianco a fianco prima di eseguire il commit Il mio valore predefinito onesto per le foto Web è di qualità 80% - I & #39; ho testato sempre più in basso su molte pagine e 80 è il punto in cui smetto di poter dire la versione compressa dall'originale a dimensioni di visualizzazione reali Se desideri il ragionamento completo, il Guida alla compressione dell'immagine Va in profondità sul perché quel numero regge.

L'errore che ho fatto per imbarazzantemente lungo: comprimere prima Ridimensionamento. Se comprimi un'immagine da 3800 px e poi la ridimensioni fino a 1200 px, hai speso tutto quello sforzo di compressione su pixel che stai per buttare via, e il file finale è più grande e peggiore che se lo facessi nell'altro modo. Ridimensiona prima, quindi comprimi l'immagine più piccola. sempre.
Quale formato di immagine dovresti effettivamente utilizzare?
Il formato del panorama ha più buone opzioni rispetto a prima, il che è un bel problema da avere. Ecco come decido, senza il gloss del marketing.
JPEG è il formato con perdita universale - supportato ovunque, ottimo per le fotografie, nessuna trasparenza It' è il fallback sicuro e ancora la giusta richiesta di posta elettronica, dove il supporto client per i formati più recenti è un coin flip.
png è senza perdite con piena trasparenza. È la scelta corretta per schermate, loghi e qualsiasi cosa con testo o spigoli vivi. è il ingiustizia scelta per le fotografie - una foto salvata come PNG può essere molte volte più grande della stessa foto di JPEG senza alcun beneficio visibile.
webp è il mio predefinito per il web nel 2026. È sia lossy che lossless, supporta la trasparenza e funziona con circa il 25-35% più piccolo di JPEG a una qualità comparabile. Il supporto del browser è effettivamente universale a questo punto. Se dovessi scegliere un formato per le immagini di un nuovo sito, questo è tutto.
avifa comprime ancora più forte - comunemente circa il 50% più piccolo di JPEG - con un'eccellente gestione dei gradienti e della trama fine I compromessi sono la codifica più lenta e supportano that' è molto buono ma non del tutto ovunque Lo uso come scelta migliore in a <picture> elemento con webp sotto.
SVG isn' t un formato raster a tutti - it' s vettore, in modo da scalare a qualsiasi dimensione senza un singolo pixel sfocato Usalo per loghi, icone e illustrazioni Don' t provare a convertire una fotografia ad esso.
La conversione tra questi è un lavoro in due clic sul convertitore di formato: Rilascia l'immagine, scegli il formato di destinazione, regola la qualità se è lossy, scarica. Il modello che spedisco su siti reali utilizza la negoziazione del formato del browser:
<picture>
  <source srcset="hero.avif" type="image/avif">
  <source srcset="hero.webp" type="image/webp">
  <img src="hero.jpg" alt="Description" width="1200" height="675" loading="lazy">
</picture>
Il browser sceglie il primo formato che comprende, quindi un telefono moderno ottiene AVIF, uno più vecchio ottiene WebP e qualsiasi cosa Antic ottiene ancora un JPEG funzionante. Nota l'esplicito width e height- quelle sono & #39; t decorazione, riservano spazio di layout e impediscono alla pagina di saltare come le immagini si caricano, che è una vittoria Cumulative Layout Shift.
Come si rimuove uno sfondo di un'immagine nel browser?
La rimozione dello sfondo significava uno strumento di abbonamento o venti minuti con lo strumento Penna in Photoshop. Ora un modello di apprendimento automatico abbastanza piccolo da poter essere eseguito in una scheda del browser gestisce i casi comuni in un paio di secondi.
la solvente per sfondo analizza l'immagine, costruisce una maschera di pixel che separa il soggetto dallo sfondo e restituisce un PNG con un canale alfa trasparente Carica, aspetta un momento, controlla i bordi, scarica Il tutto rimane locale - il modello viene eseguito sulla tua macchina, quindi anche gli scatti sensibili del prodotto non lo lasciano mai.
Funziona meglio quando gli dai una possibilità di combattimento: anche l'illuminazione, un contrasto decente tra il soggetto e cosa' c'è dietro e una fonte ragionevolmente ad alta risoluzione Capelli, pelliccia e bordi sottili sono ancora dove questi modelli lottano - se il risultato ha un alone attorno a qualcuno' s testa, che' s la modalità di fallimento da aspettarsi, non un bug che puoi configurare via I soggetti con bordi puliti come i prodotti confezionati risultano quasi perfetti.

Qual è l'ordine giusto per ottimizzare le immagini per il web?
Ogni volta che ho saltato questo ordine o l'ho fatto fuori sequenza, l'ho pagato. Fallo in questo ordine e l'output è sia più piccolo che più bello:
Passo 1 - Ridimensiona per visualizzare le dimensioni. capire la dimensione più grande in cui l'immagine verrà visualizzata, raddoppiarla per la retina e ridimensionare a quello. Questo singolo passaggio di solito fa di più per le dimensioni dei file che altro, perché stai eliminando i pixel che non si sarebbero mai visti.
Passo 2 - Converti nel formato giusto. convertire Foto su WebP (o Avif con un fallback). Mantieni loghi e schermate come PNG. Mantieni l'arte vettoriale genuina come SVG.
Passaggio 3: comprimere la qualità target. comprimere A circa l'80% per le immagini web con perdita, quindi osservare il risultato alle dimensioni effettive.
Passo 4 - Servire in modo responsabile in HTML. maneggiare srcset Quindi i browser scaricano una dimensione appropriata per il dispositivo e aggiungi loading="lazy" a qualsiasi cosa sotto la piega in modo che non blocchi la vernice iniziale.
Un budget di prestazioni vago che vale la pena mantenere: immagini di eroi sotto i 200 KB (guidano la vernice più grande e contenta, quindi contano di più), immagini di contenuti regolari sotto i 100 KB, miniature sotto i 30 KB e loghi sotto i 10 KB - usa SVG e te' di solito lo batterò senza provarlo Queste leggi aren't, loro're un test dell'olfatto Se una singola immagine passa oltre il secchio, vale la pena guardare un secondo sguardo.
Domande frequenti
Qual è il miglior strumento di immagine online gratuito?
Dipende dal lavoro, motivo per cui Toolz.dev li divide in strumenti focalizzati piuttosto che in un editor gonfio. Per le dimensioni, utilizzare Ridimensionamento immagine. Per la dimensione del file, utilizzare Comprimi immagine. Per cambiare i formati, utilizzare il convertitore di formato. Per isolare i soggetti, utilizzare il solvente per sfondo. Tutti e quattro sono gratuiti, non hanno bisogno di registrazioni ed elaborano le immagini interamente nel tuo browser.
Come posso ridimensionare un'immagine senza perdere la qualità?
Il downscaling - rendere un'immagine più piccola - costa a malapena qualsiasi qualità perché la sorgente ha più dettagli rispetto alle esigenze di dimensioni più piccole Usa il ricampionamento bicubico per il risultato più fluido Il upscaling è la direzione rischiosa: lo strumento deve inventare pixel, quindi la qualità scende, e oltre circa il 200% della dimensione originale la morbidezza diventa ovvia Quando hai bisogno di una versione molto più grande, torna al file sorgente originale piuttosto che ingrandire una piccola copia.
Quale formato di immagine devo utilizzare per il mio sito web?
Usa WebP per le fotografie e la maggior parte delle immagini dei contenuti - it's circa il 255% più piccolo di JPEG con supporto quasi universale nel 2026 Usa loghi e icone SVG in modo che rimangano nitidi a qualsiasi dimensione Usa PNG solo quando hai bisogno di qualità senza perdita di dati con trasparenza Raggiungi AVIF quando desideri la massima compressione e puoi abbinarlo a un fallback WebP in un <picture> elemento.
Devo ridimensionare prima o dopo la compressione?
Ridimensiona prima, quindi comprimi. Comprimere un'immagine di grandi dimensioni e poi ridurla spreca fatica su pixel che vengono scartati durante il ridimensionamento e il file finale finisce per una qualità sempre maggiore e inferiore rispetto a se l'avessi fatto nell'ordine corretto. Ridimensionare innanzitutto significa che il compressore lavora sull'immagine più piccola, producendo il risultato più piccolo e pulito.
È sicuro utilizzare gli strumenti di immagine online con foto personali o dei clienti?
La maggior parte degli strumenti di immagine online carica le tue foto sui loro server per elaborarle, il che è una vera preoccupazione per qualsiasi cosa privata o sotto NDA. Gli strumenti di immagine su Toolz.dev elaborano tutto il lato client nel browser utilizzando l'API Canvas e, per la rimozione dello sfondo, un modello ML nel browser. Le tue immagini non lasciano mai il tuo dispositivo, quindi sono al sicuro per immagini personali, lavoro con i clienti e scatti di prodotti riservati.
Qual è la differenza tra WebP e AVIF?
Entrambi battono JPEG e PNG sulla compressione WebP è circa il 25% più piccolo di JPEG con il supporto del browser effettivamente universale, il che lo rende l'impostazione predefinita pratica AVIF spinge ulteriormente la compressione - comunemente circa il 50% più piccola di JPEG - e gestisce meglio gradienti e texture, ma codifica più lentamente e supporta is' t ancora ovunque L'approccio comune è quello di servire AVIF prima con WebP come fallback in modo che ogni browser ottenga il miglior formato che possa decodificare.
Come faccio a rimuovere lo sfondo da un'immagine gratuitamente?
Apri il solvente per sfondo, rilascia l'immagine e un modello nel browser rileva il soggetto e sostituisce lo sfondo con trasparenza, dandoti un PNG con un canale alfa. Funziona meglio con un'illuminazione uniforme e un chiaro contrasto tra soggetto e sfondo. I dettagli fini come i capelli volanti sono ancora la custodia rigida per qualsiasi strumento automatico, quindi controlla i bordi prima di fare affidamento sul risultato.
Perché le immagini del mio sito Web stanno rallentando la pagina?
Quasi sempre it's una delle tre cose: l'immagine è memorizzata molto più grande di quanto visualizza, it's in un vecchio formato come una foto PNG non compressa, o non è mai stato eseguito attraverso un passaggio di compressione Fissarli in ordine - ridimensionare per visualizzare le dimensioni, convertire in WebP, quindi comprimere a circa l'80% di qualità - e tu'll in genere tagliare il peso totale dell'immagine di più della metà, che si presenta direttamente nel tuo punteggio più grande Contentful Paint.
Come ottengo un'immagine inferiore a 100 kb?
Lavora in questo ordine e fermati non appena tu' sei sotto il limite: ridimensiona alle dimensioni in cui l'immagine viene effettivamente visualizzata, converti in WebP, quindi comprimi all'80% della qualità Per una tipica foto larga 1600 px quella combinazione atterra da qualche parte tra 60 e 120 KB. Se tu' sei ancora finito, abbassa la qualità al 70% prima di ridurre ulteriormente le dimensioni: la perdita di qualità al 70% è molto meno evidente di un'immagine visibilmente più piccola.
Posso convertire le foto HEIC dal mio iPhone a JPG?
si. rilasciare il file .heic nel convertitore di formato ed esportalo come JPG, PNG o WebP. HEIC è il formato in cui gli iPhone salvano per impostazione predefinita e, sebbene si comprima bene, la maggior parte delle app Windows, dei browser più vecchi e dei sistemi di gestione dei contenuti rifiutano comunque di aprirlo, motivo per cui la conversione in JPG o WebP prima di caricarlo ovunque è solitamente la mossa sicura.